We’ve all been there – you hop on your trusty two-wheeler, turn the key, press the button, and… nothing. Your scooter/moped won’t start with the electric starter. Don’t worry, we’ve got you covered! In this article, we’ll provide a detailed, easy-to-understand guide to help you diagnose and fix the problem yourself. We’ll try to keep the technical jargon to a minimum, or at least explain what we’re talking about when we do.
This guide is designed for all skill levels and will work for 50cc, 125cc, 150cc or really any cc moped or scooter! We’ll break down every issue that can prevent your scooter or moped from starting with the electric starter and walk you through the process of identifying and fixing the problem. So, grab your tools, put on your DIY hat, and let’s get that scooter or moped back on the road!
Please note, that to follow this guide through and diagnose your issue, you will need a multimeter, a set of crocodile clips, and a basic mechanics tool kit as a minimum.
Scooter/Moped Won’t Start with Electric Starter – The Basics
Before we dive into the nitty-gritty of diagnosing and fixing your scooter or moped, we need to understand what parts make up a starter system on a scooter. Understanding what these parts are and how they work together will make it easier to follow the rest of the guide and get your scooter fixed!
The Electric Starter System Components
The electric starter system is what gets your scooter or moped running when you press the start button. Along with wiring, it consists of several parts that work together to start the engine:
- Battery: The power source for your scooter/moped. It provides the necessary energy to crank the engine.
- Starter Button: The switch you press to initiate the starting process.
- Fuse: A small electrical device that protects the electrical system from damage caused by excessive current. If the fuse is blown, the electrical current won’t reach the starter system.
- Brake Switch: A safety feature that requires you to engage the brake before the starter motor can be activated. This prevents accidental starts while the scooter or moped is in motion.
- Starter Solenoid or Relay: A magnetic switch that connects the battery to the starter motor when you press the starter button, both do the same job but are designed slightly differently.
- Starter Motor: This little motor turns the engine over, helping it to suck in air and fuel, which then ignites and starts the engine.
- Starter Bendix: A one-way clutch that allows the starter motor to turn the engine over, but disengages once the engine starts running. This prevents the starter motor from being damaged by the running engine.
- Wiring: The electrical wire that carries the power around all the various components.
Scooter/Moped Electric Starter System Wiring Diagram
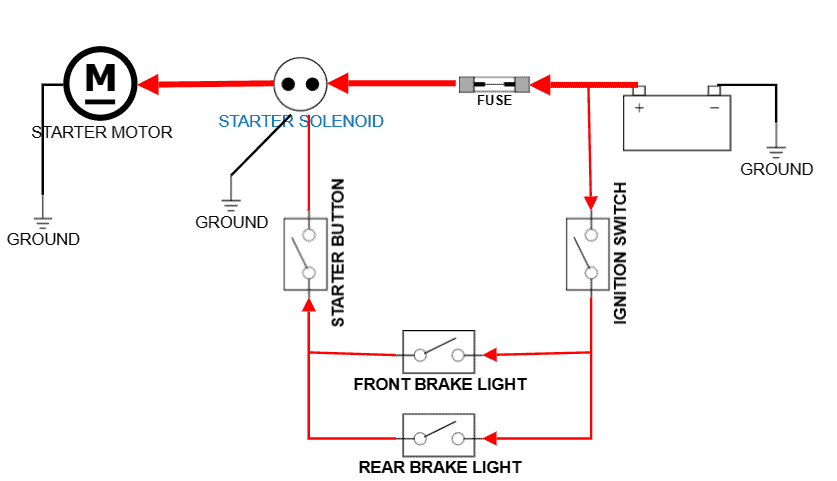
As you can see in the wiring diagram above, a scooter/moped electric starter system is really made up of two separate electrical systems. One is indicated by the thick red line (we’ll call this system 1), the other is indicated by a thin red line (we’ll call this system 2).
In system 1, the main battery cable runs from the battery, through a fuse to the starter solenoid/relay. The starter solenoid/relay is “normally open”, meaning that the power will not flow through the solenoid until it is told to. From the starter solenoid/relay the wire then travels to the starter motor.
This part of the system is the high current part (indicated by its thinker red line), it uses a thicker wire to carry the current required from the battery to turn the starter motor.
System 2, with the thinner wire coming from the battery, is what’s called the “control circuit”, its ultimate goal is to tell the starter solenoid/relay when to close, allowing system 1 to get power all the way from the battery to the starter motor, thus cranking the engine.
In system 2, the wire (power) first travels to the ignition switch, this is where you put your key. When you have inserted your key and moved it to the “on” position, the power can travel to your brake switches. When you press on a brake lever, the power can then travel to the starter switch, and when you press then starter switch, the power can complete the circuit and close the starter solenoid.
We hope this makes some sense and you are beginning to see how the electrical starter system works. Next, we will go through each of the components and look at how we can test them to find the fault. You will need a basic mechanics tool kit to access the parts, a multimeter to test them, and some jumper wires with alligator clips for testing the starter solenoid/relay and the starter motor…


Battery
Think of the battery as the heart of your scooter or moped’s electric starter system. It gives power to the starter motor, which then turns the engine over. If the battery doesn’t have enough juice, the starter motor won’t have the energy it needs to get your engine going. That’s why a weak or dead battery can stop your electric start from working.
If your battery’s voltage is too low, try charging it or getting a new one. If the voltage is normal, you most likely have an issue with another part of the electric starter system.
Where’s the Battery?
The battery is usually hidden in one of these three spots:
- Under the seat: Pop open the seat, and you’ll probably find the battery chilling there. It’s often held down with a strap or bracket, you will sometimes have to remove a little plastic cover to get to it.
- Under the floorboard: Sometimes, it’s hiding under the floor where you place your feet. You might need to unscrew some stuff to get to it. Check your scooter’s manual for instructions.
- In a special compartment: Some scooters have a little door or cover on the side just for the battery. Look around for it and open it up.
Testing the Battery with a Multimeter
Here’s how you can use it to check if your battery is the problem:
- Set up the multimeter: Turn off your scooter and take the keys out. Set your multimeter to measure DC voltage (the “V” with straight lines). Pick the setting closest to 12 volts, since that’s what most scooter batteries are.
- Find the battery terminals: Take off any cover on the battery, and you’ll see two terminals marked “+” (positive) and “-” (negative).
- Connect the multimeter probes: Touch the red (positive) probe to the “+” terminal and the black (negative) probe to the “-” terminal.
- Check the voltage: Look at the multimeter’s display. A fully charged 12-volt battery should show around 12.6 volts. If it’s lower than 12 volts, your battery might be weak or not charged enough.
Starter Button
The starter button is like the messenger between you and your scooter’s electric starter system. When you press it, it tells the starter solenoid to close and allows power to reach the starter motor.
If the button is faulty or damaged, that signal never gets sent, and your scooter or moped won’t start. Let’s break down how to find and test it in simple steps.
Where’s the Starter Button?
The starter button is super easy to find! It’s usually located on the right side of the handlebars, near the throttle grip. It’s often marked with a lightning bolt symbol or the word “START.”
Testing the Starter Button with a Multimeter
To test the starter button, we’ll use a basic technique called a continuity test. Here’s how to do it:
- Set up the multimeter: First, turn off your scooter and take the keys out. Set your multimeter to measure continuity (the continuity symbol looks a bit like a Wi-Fi hotspot, with 4 or 5 curved lines each bigger than the last, the setting with an OHM symbol Ω will also be fine, it’s actually measuring resistance, but suits this test well). The meter will likely read “OL” at this point, meaning Open Leads. To check the meter’s working, touch the two probes together and watch the screen, it should show a reading near 0.00 and/or beep.
- Access the starter button wires: You’ll need to find the wires connected to the starter button. They’re usually hidden inside the handlebar or under a plastic cover. Carefully remove the cover or open up the handlebar to expose the wires. Look for two wires connected to the starter button (often one wire is black and the other may be a different color, they won’t both be red like our wiring diagram).
- Disconnect the wires: To test the button, you’ll need to disconnect the wires from it. Gently unplug the connectors or remove the screws holding the wires in place, depending on your scooter’s design.
- Connect the multimeter probes: Touch one probe to each wire connector or exposed wire end (it doesn’t matter which probe goes where).
- Press the starter button: While holding the probes in place, press the starter button and watch the multimeter’s display. If the button is working, the multimeter should show a change in reading and again go close to 0.00, or you’ll hear a beep (depending on your multimeter and setting).
Fuse
A fuse is like a tiny bodyguard for your scooter’s electrical system. If too much power tries to flow through the system, the fuse steps in and “blows” to protect everything else. When a fuse blows, it breaks the electrical connection and stops the flow of power. This means that if the fuse for your electric starter system is blown, power can’t reach the starter motor, and your scooter or moped won’t start.
Where’s the Fuse?
Fuses can be found in a couple of places on your scooter or moped:
- Under the seat or floorboard: Just like the battery, the fuse might be hiding under the seat or the floorboard. Open the seat or remove the floorboard to take a look.
- Near the battery: Sometimes, the fuse is located close to the battery or inside the battery compartment. Check around the battery for a small plastic case or container that holds the fuse.
Checking the Fuse
Once you’ve found the fuse, it’s time to check if it’s the culprit. Here’s how:
- Remove the fuse: Carefully take the fuse out of its holder. Fuses often look like small glass or plastic tubes with metal caps on both ends. They come in different sizes, so yours might be tiny or a bit larger.
- Inspect the fuse: Hold the fuse up to the light and look inside. There should be a thin metal wire connecting the metal caps. If the wire is broken or burnt, the fuse is blown and needs to be replaced.
- Test the fuse with a multimeter (optional): If you’re not sure whether the fuse is blown just by looking at it, you can test it with a multimeter. Set the multimeter to measure continuity (Wi-Fi hotspot symbol or Ω). Touch one probe to each metal cap on the fuse. If the fuse is good, the multimeter should show close to 0.00 or beep (depending on your multimeter and setting).
Brake Switch
On most scooters and mopeds, you need to engage the brake before the electric starter can work. The brake switch acts as a safety lock for your scooter or moped’s electric starter system. It ensures that the scooter doesn’t start unless you’ve engaged the brake. If the brake switch is faulty, even if you squeeze the brake lever, it won’t allow power to continue along the control system (system 2) to your starter switch, and your scooter or moped won’t start.
Where’s the Brake Switch?
The brake switch is typically found near the brake lever(s) on your scooter or moped’s handlebars. There are usually two brake levers – one for the front brake and one for the rear brake. Some scooters and mopeds have a switch on both levers, while others have one on just one of the levers. Look for a small switch or button close to the brake lever pivot.
Testing the Brake Switch with a Multimeter
To test the brake switch, we’ll use another continuity test. Here’s how to do it:
- Set up the multimeter: Turn off your scooter and take the keys out. Set your multimeter to measure continuity (we’ll assume you know how to do this by now).
- Access the brake switch wires: Locate the wires connected to the brake switch. They’re usually hidden inside the handlebar or under a plastic cover. Carefully remove the cover or open up the handlebar to expose the wires. Look for two wires connected to the brake switch (the colors may vary depending on your scooter’s design).
- Disconnect the wires: To test the switch, you’ll need to disconnect the wires from it. Gently unplug the connectors or remove the screws holding the wires in place, depending on your scooter’s design.
- Connect the multimeter probes: Touch one probe to each wire connector or exposed wire end (it doesn’t matter which probe goes where).
- Squeeze the brake lever: While holding the probes in place, squeeze the brake lever and watch the multimeter’s display. If the switch is working, the multimeter should show a reading of around 0.00 or you’ll hear a beep (depending on your multimeter).

An easy way to check your brake switch works is to turn the key on and have someone stand behind you.
If the brake light comes on when you squeeze the brake lever, the brake switch isn’t faulty and works fine!
Starter Solenoid or Relay
The starter solenoid/relay is like a gatekeeper for the power that flows between the battery and the starter motor. When you press the starter button and engage the brake, the solenoid/relay closes a circuit, allowing power to flow from the battery to the starter motor, which then turns the engine over. If the solenoid/relay is faulty, it won’t close the circuit, and your scooter or moped won’t start.
Where’s the Starter Solenoid/Relay?
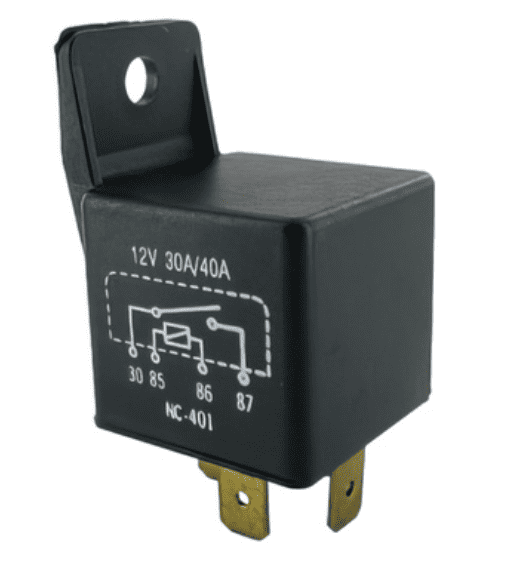
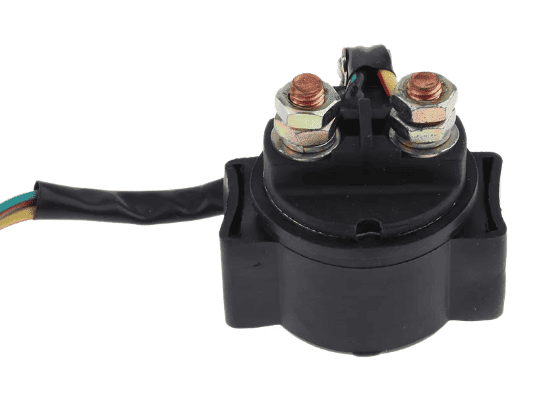
Some mopeds have a starter solenoid, and some have a relay. They do the same job but do look different. A starter solenoid is a cylindrical shape with two large wires and one or two smaller wires connected to it. A starter relay is a black box with a 4-pin plug attached to the bottom of it.
The starter solenoid or relay is typically located near the battery or the starter motor. If you follow the larger red wire coming from the battery you’ll find it.
Testing a Starter Relay
Testing a starter relay might seem a bit intimidating at first, but it’s pretty simple once you understand how it works. A starter relay typically has pins numbered 30, 85, 86, and 87. Here’s a step-by-step guide on how to test it:
What You’ll Need:
- A 12-volt power source (your mopeds battery)
- A multimeter
- Jumper wires with alligator clips
Testing the Starter Relay:
- Remove the Relay: Take the connector off and remove the relay from the moped/scooter
- Identify the pins: Look at the bottom or side of the relay for a diagram that shows the pin numbers. The pins are usually numbered the same way and mean the following:
- Pin 30: Power input from the battery – The wire in our system 1 coming from the battery
- Pin 85: Relay coil ground – The ground wire shown in our diagram
- Pin 86: Relay coil trigger – The wire in system 2 that comes from the starter switch
- Pin 87: Power output to the starter – The wire from relay to starter in system 1
- Connect the relay coil pins to a power source: Attach one end of a jumper wire with an alligator clip to pin 85 (relay coil ground) and the other end to the negative (-) terminal of your moped’s battery. Connect another jumper wire with an alligator clip to pin 86 (relay coil power) and the other end to the positive (+) terminal of your battery. When you do this, you might hear a clicking sound, which means the relay is activating.
- Set up the multimeter: Turn on your multimeter and set it to measure continuity.
- Test for continuity: Touch the multimeter probes to pins 30 and 87 on the relay. If the relay is working properly, the multimeter should show a reading of around 0.00 or beep (depending on your multimeter and setting) when the relay is connected to the power source. This indicates that there’s a closed circuit between pins 30 and 87, which allows the power to flow through the relay.
- Disconnect the power source: Finally, disconnect the jumper wires from the power source and the relay. The multimeter should now show OL, indicating that the relay has returned to its default open-circuit state.
If the relay doesn’t activate when connected to the power source or doesn’t show continuity when it’s supposed to, it is faulty and will need to be replaced. This video may help you visualize this process better:
Testing a Starter Solenoid
Testing a starter solenoid is almost the same as testing a stater relay. It can appear daunting but actually isn’t that difficult. Here’s a step-by-step guide on how to test a starter solenoid:
What You’ll Need:
- A multimeter
- Jumper wires with alligator clips
- A 12-volt power source (your moped’s battery)
Testing the Starter Solenoid:
- Disconnect the solenoid: First, make sure your scooter or moped is turned off and the key is removed. Disconnect the battery. Locate the starter solenoid and disconnect it from the scooter. This will involve disconnecting the large cables coming from the battery and the starter motor, as well as the smaller control wires.
- Identify the terminals: Look at the solenoid and identify the different terminals. You should see two large terminals and two smaller terminals. The large terminals are the main power connections (battery and starter motor), while the smaller terminals are for the control signal from the starter button and a ground.
- Set up the multimeter: Turn on your multimeter and set it to measure continuity.
- Check for continuity: Touch the multimeter probes to the large terminals on the solenoid. The multimeter should show no continuity or a very high resistance, indicating that the solenoid is in its default open-circuit state.
- Connect the solenoid to a power source: Attach a jumper wire with an alligator clip to the solenoid’s ground terminal (usually marked “GND” or “GRD” but it doesn’t matter if you get this wrong!) and the other end to the negative (-) terminal of your battery.
- Activate the solenoid: Connect another jumper wire with an alligator clip to the smaller control terminal (usually marked “S” or “SW” but it doesn’t really matter if you get this wrong!) on the solenoid, and briefly touch the other end of the wire to the positive (+) terminal of your battery. You should hear a clicking sound as the solenoid activates.
- Check for continuity again: While the solenoid is activated, touch the multimeter probes to the large terminals on the solenoid again. If the solenoid is functioning properly, the multimeter should now show continuity or a very low resistance, indicating that the solenoid is closing the circuit and allowing power to flow through it.
- Disconnect the solenoid: Finally, disconnect the jumper wires from the solenoid and the power source.
If the solenoid doesn’t activate when connected to the power source or doesn’t show continuity when it’s supposed to, it may be faulty and need to be replaced.
Starter Motor
Congratulations if you’re still with us at this point, there isn’t much left to test, we promise! The starter motor plays a big role in getting your scooter or moped going. It’s the small but mighty component at the end of the line that gives your engine the push it needs to start running.
Where’s the Starter Motor?
You’ll typically find the starter motor tucked in behind the transmission case (the long casing that goes from the engine to the rear wheel), near the engine. It’s a cylinder-shaped part with a large terminal where the power cable from the solenoid connects. The motor is mounted to the engine casing with bolts.
Testing the Starter Motor
- Remove the starter motor: First, make sure your scooter or moped is turned off, the key is removed, and the battery is disconnected. Locate the starter motor and disconnect it from the scooter. This usually involves disconnecting the large cable from the solenoid and any other connections or bolts that secure the motor to the engine.
- Secure the starter motor: Place the starter motor in a bench vise or on a stable surface to keep it secure while testing. Ensure that the motor is not touching any conductive surfaces.
- Set up the multimeter: Turn on your multimeter and set it to measure continuity.
- Check for continuity: Touch one multimeter probe to the metal casing of the starter motor and the other probe to the large terminal where the power cable connects. The multimeter should show no continuity or a very high resistance (number), indicating that the starter motor’s internal components are not shorted to its casing.
- Connect the starter motor to a power source: Attach one end of a jumper cable with an alligator clip to the starter motor’s casing and the other end to the negative (-) terminal of your battery. Attach another jumper cable with an alligator clip to the starter motor’s large positive terminal and leave the other end free.
- Activate the starter motor: Briefly touch the free alligator clip connected to the positive (+) terminal on the starter motor onto the positive (+) battery terminal. The starter motor should engage and spin. If it doesn’t spin or it struggles to spin, the motor could be faulty.
- Disconnect the starter motor: Finally, disconnect the jumper cables from the starter motor and the power source.
If the starter motor shows continuity when it’s not supposed to, or doesn’t spin when connected to the battery, it will need to be replaced.
If you have someone to help you, you can jump straight to this step.
Assuming the starter motor is still attached to the scooter, set your multimeter to measure DC voltage (the V with the straight line).
Attach the black probe to the engine casing and the red probe to the positive terminal on the starter motor.
Have a friend turn the key on, press the brake lever and hit the start button.
You should see +12V on your multimeter when they do this.
If you see the voltage, the electrical systems are working and it’s likely the starter motor or starter bendix is faulty.
If you see no voltage, it’s a problem with either of the electrical systems.
Starter Bendix
Now we come onto something we haven’t talked about so far in this article, the starter bendix.
The starter bendix is an essential, but often overlooked part of your scooter or moped’s electric start system. It’s a cylindrical metal component with a gear on either end that is designed to extend and engage with the variator drive face gear when the starter motor spins and then retract once the engine starts running.
When you press the electric start button, the starter motor begins to spin. As it spins, the starter bendix extends out to connect with the drive face gear, a big gear connected to the variator.
Once the bendix gear and the drive face gear are connected, the spinning motion from the starter motor is transferred to the engine, making it start running. After the engine starts, the bendix gear retracts, disconnecting from the drive face gear so it doesn’t keep spinning along with the engine.
Where’s the Starter Bendix?
The starter bendix is located in front of the starter motor. In most scooters and mopeds, you can find it inside the transmission case, which is the long casing that runs between the engine and the rear wheel. This casing houses the variator, belt and clutch.
To access the starter bendix, you will need to remove the transmission cover, which is held on with lots of bolts all around it.
Testing the Starter Bendix
If your scooter or moped isn’t starting and you think the starter bendix might be the problem, here’s a simple way to check its function:
- Locate the starter bendix: First, make sure your scooter or moped is turned off and the key is removed. Find the starter bendix, which is usually inside the transmission case.
- Inspect the bendix: Check the starter bendix for any visible signs of wear or damage, such as worn teeth on the gears or a bent shaft. If you notice any issues, it might be time to replace the bendix.
- Test the bendix function: Manually spin the bendix gear by hand. It should rotate freely in one direction but lock up when you try to spin it in the opposite direction. If it spins freely in both directions or doesn’t spin at all, the bendix might be faulty.
The Starter Bendix slots into position in 2 holes, one in the engine side and the other in the transmission case.
These 2 holes are what hold the bendix where it needs to be. Both of these guide holes have bushes pressed into them that are designed to wear rather than the engine casings.
It’s a good idea to check the condition of these bushings.
We’ve seen cases where believed problems with the starter bendix have turned out to be nothing more than worn or even completely missing bushings!
Wires
If you’ve followed this entire guide, checking each component of your scooter or moped’s electric start system, and still haven’t found the root of the problem, there’s a chance that the issue lies with the wiring itself. Wires are like the veins of your scooter’s electrical system, connecting all the components and ensuring they receive power and communicate with each other.
Here are a few reasons why wires could be causing issues with your electric start system:
- Damaged or frayed wires: Over time, wires can become damaged, frayed, or broken, affecting the flow of electricity and causing problems with your electric start. Inspect the wiring for any visible signs of damage or wear, paying close attention to areas where the wires might rub against other parts or be exposed to heat.
- Loose connections: Sometimes, wires can become loose or disconnected from their terminals or connectors. This can result in a weak or non-existent connection between components, causing your electric start system to malfunction. Check all the wiring connections to ensure they’re secure and properly connected.
- Corrosion: Moisture, dirt, or other contaminants can lead to corrosion on wiring connections or terminals, which can inhibit the flow of electricity. Inspect the wiring for signs of corrosion and clean or replace the affected parts as necessary.
- Short circuits: If the insulation around a wire is damaged, the exposed wire can touch other metal parts or wires, creating a short circuit. This can lead to problems with your electric start system, as well as frequently blowing fuses. Inspect the wiring for any signs of exposed or damaged insulation and replace any affected wires.
Conclusion
In conclusion, understanding the various components of your scooter or moped’s electric start system and how to troubleshoot them can save you time, money, and frustration. With this guide, you’ve gained the knowledge to identify and tackle common issues that can prevent your scooter or moped from starting with the electric starter. From the battery to the wiring, we’ve covered all the elements that play a role in your vehicle’s electric start system.
Remember, always be cautious when working with electrical components and consult your owner’s manual or a professional mechanic if you’re unsure about any part of the process. We hope this article has helped you fix your problem, but please feel free to contact us if you need any more info!
Rhys is a qualified mechanic with a passion for mopeds and engines of all sizes. He has owned and worked on mopeds since his early teens and is dedicated to sharing his knowledge and helping others get the best of their machines. He currently owns 1 fully intact moped but has a few others in pieces in the workshop. More about Rhys